Add an Environment
We talk about environments in software development - e.g. dev, qa, staging, pre-prod and production environments. Let's read further to understand what is an Environment.
What is an Environment?#
In simpler words, "environment" encompasses a specific runtime for an application that may or may not be hosted in the cloud. For many development teams, dev environments exist on their desktop or laptop.
- A developer writes the code for a feature and he wants to add this new feature/functionality to the application. The developer must check, validate and integrate this feature before he deploys it to production-grade environments.
- On the other hand, there are many developers writing the code for multiple features within an application.All these features need to be tested before they go into production and are integrated into the application.
- This requires multiple common environments where development & QA teams can test the changes end to end before they’re pushed to production. This assures teams that what they're testing is identical to what will run in production.
How to add an Environment?#
Here’s how teams can add an environment with BuildPiper.
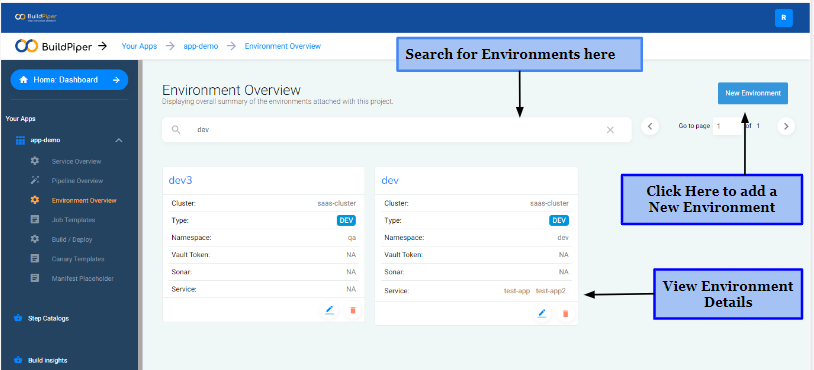
- Sign in to BuildPiper User Portal -> Main Dashboard -> Environment Overview.
- The Environment Overview Page displays information regarding all the environments within an application and also the services associated with that environment.
- Choose the type of your environment: Dev, QA, Staging, UAT and Prod environment.
- Give a Name to the environment.
- Choose "Yes" if you want to allow a Manual Build/Deploy else choose "No".
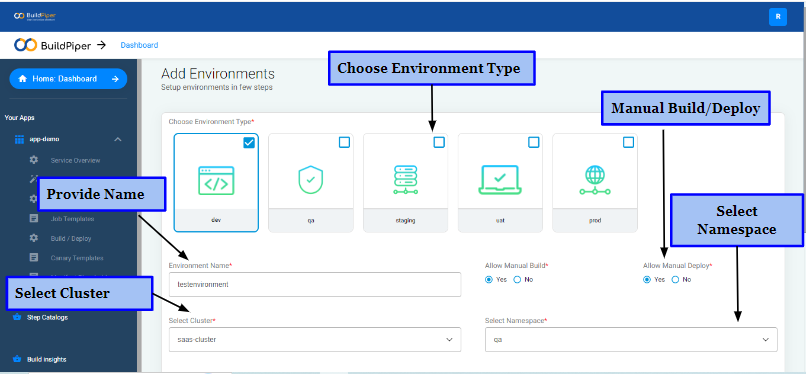
- Select the Cluster with whose Namespace you want to associate the environment.
- Choose Namespace with which you want to associate the environment.
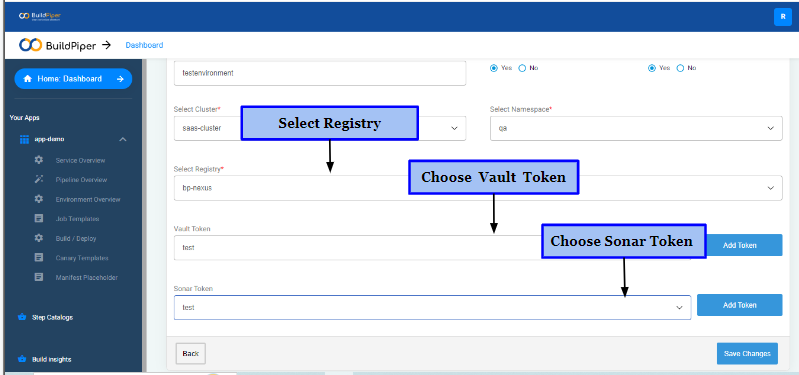
- Select Service Registry where the docker images will be stored. All artifacts are pushed into and pulled from the Service Registry.
- Choose an already existing Vault and Sonar Token or add a new one.
- Finally, save the changes and proceed further.
Now, let's also read about Vault and Sonar Tokens here.
What are Vault Tokens?#
Tokens are the core method for authentication within Vault. Vault creates a token when you bind your application to the Vault service instance or create a service key. You can use this token to access your Vault service instance. In Vault, tokens are used to represent a set of policies and they're associated with a specific set of permissions._
What are Sonar Tokens?#
A Sonar token refers to a unique string of characters that can be used to authenticate and authorize a user or service to access the SonarQube API. Tokens are generated by SonarQube and can be used for accessing the API. This makes it possible to automate tasks and integrate SonarQube with other tools._